Don’t forget your shoes / Glöm inte bort skorna

I have sewn 5 pairs of shoes during the last 1,5 years. The ones I show in this blog are my second pair.

When they were finished I rubbed them with leather oil and shoe fat to make them a bit waterresistant and also a bit softer. After the oil they were a bit uneven in the colour with brown markings, but I didn’t mind so much.

After the third time I used them we ended up in a rainstorm and they were completley drenched.
The brown spots had become very visible after the unwanted foot-bath and they didn’t come of even after a good rub with a towel and more leather oil. So i kind of discarded them and made a new pair as these also stretched a bit and became a bit to big for my feet.

Yesterday I decided to give them a wash with saddle soap since I were going to lend them out to a display that the local medieval group are going to attend this weekend. And I didn’t want to display dirty shoes since I know that people often wants to touch them to turn and watch from all sides.

And…

The markings and stains disappeared… I was flabbergasted… How? I had rubbed so hard earlier with water, oil and a rough cloth, but with no effect. And the saddlesoap just quite magically made it wanish.

So – I urge you all…
Clean your shoes and other leather items regularly, and oil / grease them after. They just dont look prettier- they will also last longer 

* * * * * * * * * * * * * * * * * * * * * *

Under det senaste 1,5 året så har jag sytt 5 par skor. Dom jag visar här i inlägget är mitt andra par.

När dom var nysydda så oljade jag in dom ordentligt och la även på läderfett för att göra dom både lite mer vattentåliga men också mjukare. Efter att jag oljat in så hade det blivit lite färgförändringar med bruna fläckar men det var ok. Det kunde jag leva med liksom.

Tredje gången jag använde skorna så hamnade vi i ett riktigt regnoväder och dom blev ordentligt dränkta.
Det resulterade dels i att dom bruna fläckarna blev större och värre, men också att skorna tänjdes ut. Och jag har inte använt dom så mycket efteråt, jag sydde nya skor istället.

I går bestämde jag mig för att göra rent dom med sadeltvål eftersom jag skulle låna ut dom till en monter på en mässa som den lokala medeltidsgruppen ska vara med på och lortiga skor är inte så trevligt om man vill vrida, vända och kika på dom från alla håll och kanter.

Och…

Märkena försvann… dom nästan bara gled bort, typ magiskt…
Jag fattade först inte hur det gått till. Jag hade ju putsat av skorna tidigare med en grov handduk och vatten och sen med olja och fläckarna hade suttit som berget då.

Så – min uppmaning till alla är att göra rent era lädersaker ordentligt, och smörja/fetta in. Inte bara smörja.
Ni förlänger livslängden väldigt mycket på era grejor genom att ge dom lite kärlek ibland 

A recap about the hose / Uppföljning av hosorna

A good friend did a tutorial on hosemaking and we do these the same way.
So if something is unclear in my sew-along, perhaps you can find the answer here 

* * * * * * * * * * * * * * * * * * * * *

En god vän har också gjort en tutorial angående att sy hosor, och vi syr våra på samma sätt.
Så om ni tyckte att något var oklart i min sew-along så kanske ni kan hitta svaret här 


A quick tutorial on hose making 


* * * * * * * * * * * * * * * * * * * * * * *

I also got a question about how the seams looks and where they sit under the foot.
I’ve tried to take a photo, but I can’t get a good image of the seams, so I made a drawing instead…
The red outline is supposed to be the edge of the hose as seen from the sole of the foot.
The blue dotted lines is the seams.

* * * * * * * * * * * * * * * * * * * * * * *

Jag har också fått en fråga om hur sömmarna ser ut och hamnar under foten.
Jag har försökt att fota, men jag får inte till någon bra bild på sömmarna, så nu har jag ritat istället…
Den röda linjen ska försöka visa hur hosan ser ut, sett från undersidan av foten.
De blåa prickade linjerna är sömmarna

Just one kirtle? / Bara en kjortel?

What would you say if I said that you can use the same kirtle no matter what period you recreate?
At least between the viking age and to the end of the 15th century.
Well, at least if you recreate a woman. For men it can be a little more difficult since the length of the kirtle changed trough the ages.  But kneelength could be ok as long as you don’t attend a high demand event.

How could it be possible?
I will try to show you, the part for us girls anyway

* * * * * * * * * * * * * * * * * * * * * * *

Vad skulle du säga om jag sa att du kan använda samma kjortel oavsett vilken tidsepok du återskapar?
Åtminstone mellan vikingatid och slutet av 1400-talet.
Nåja, om du återskapar en kvinna så stämmer det i alla fall. För män kan det vara lite krångligare eftersom längden på kjorteln varierade mellan århundradena. Men knälängd kan funka så länge du inte besöker några högkravsevent i alla fall.

Hur kan det här stämma?
Jag ska försöka visa dig, i alla fall tjej-biten

This is me as a viking. The green kirtle is borrowed, the yellow kirtle is sewn in the same way as the kirtle I sewn earlier in this blog. It is the yellow kirtle, sewn by ”square pieces and gussets-principal”,  that you will see in all the pictures that follows.
I just change accessories and hairstyle in the pictures.

My friend who made this project with me, is Annie Rosén.
She makes beautiful jewelry (wich you can find here) but also beautiful pictures
When we met at Medieval week this year (2015) and started talking about this idea, we couldn’t let it go.
So here it is

* * * * * * * * * * * * * * * * * * * * * *

Det här är jag som viking. Den gröna kjorteln har jag lånat och den gula kjorteln är den som kommer finnas med på alla bilder i denna post. Den är sydd på samma sätt som kjorteln jag bloggade om tidigare här. Det vill säga med ”raka stycken och kilar-principen”.
Det enda jag gör på följande bilder är att ändra frisyr och byta accessoarer.

Min vän och kompanjon i detta projekt är Annie Rosén.
Hon gör vackra smycken (som du kan hitta här) men även vackra bilder
När vi träffades på medeltidsveckan i år (2015) och kom in på den här idén så kunde vi inte släppa den.
Och nu är den här

* * * * * * * * * * * * * * * * * * * * * *

Ok, lets get started then

First out is a picture from about 1250. You can find the original in the Maciejowski-bible (from France)

Spot the difference?
Ok my kirtle could have been a bit longer I don’t quite get that bulk at the belt (as you will notice on later pictures) but the style of the kirtle is spot on.
* * * * * * * * * * * * * * * * * * * * * *

Ok… då börjar vi

Vi börjar med en bild från mitten av 1200-talet Originalet kan hittas i Maciejowski-bibeln (från Frankrike)

Finn fem fel?
Ok, min kjortel kunde ha varit en bra bit längre. Jag får liksom inte riktigt det där pöset vid bältet (som du även kommer märka i senare bilder) men stilen på kjorteln stämmer på pricken.


Next picture is dated to 1300-1325 and can be found in Breviary of Chertsey Abbey, England.

Look what a different hairstyle and/or headgear will do…

* * * * * * * * * * * * * * * * * * * * * *

Nästa bild är daterad till 1300-1325 och originalet kan hittas i  Breviary of Chertsey Abbey, England

Se vilken skillnad en annan frisyr och/eller huvudbonad gör…

And now we move to France in 1340-1350 where we find this image in Roman en Prose de Lancelot du Lac.

My wonderful dog is the best accessory  but the dress still fits fine. Here under an sleeveles surcote.

* * * * * * * * * * * * * * * * * * * * * *

Vi förflyttar oss till 1340-1350 och Frankrike där vi hittar denna bild i Roman en Prose de Lancelot du Lac.

Min underbara hund är den bästa accessoaren  men klänningen funkar fortfarande. Här har jag även en ärmlös surcot över den.

In Germany it could look like this in 1360. The manuscript is Speculum humanae salvationis.

* * * * * * * * * * * * * * * * * * * * * *

Året är 1360 och platsen är Tyskland, manuskriptet är Speculum humanae salvationis.

In 1412-1416 a picture from the French almanac could look like this. Source Très Riches Heures du Duc de Berry

* * * * * * * * * * * * * * * * * * * * * *

1412-1416 kunde en almanacka se ut på det här sättet. Très Riches Heures du Duc de Berry, Frankrike

And now for the last picture. It is 1476 and the manuscriptis Livre de la chasse.
We could have found more pictures (there are so many to choose from where theese kind of kirtle is plausible) but we thought that you could try a bit on your own.
Don’t forget to show your own pictures in the comments

Remember, we don´t know wich patterns these kirtles are sewn from. But, as you can see… It works just fine with this kind

* * * * * * * * * * * * * * * * * * * * * *

Här har vi då sista bilden. Året är 1476 och manuskriptet är Livre de la chasse.
Vi kunde säkert hittat och återskapat fler bilder (det finns så många att välja mellan där den här typen av kjortel är möjlig/ trolig) men här någonstans tänkte vi att ni själva skulle få försöka

Kom ihåg, vi vet inte vilka mönster dessa kjortlar på bilderna är sydda efter, men som du kan se så passar vår typ av kjortel in helt perfekt

Heads up / Det är huvudsaken

This will be a short tutorial. I won’t show so much of the actual sewing this time, but you can find the techqniques in the earlier sew-alongs.

You already know wich stitches to use (and if you have missed that, find the kirtle sew-along and the post that is named ”time to sew”) so let us get on with this 

This time I will make a very simple headgear. It is basically a upside down bag, a bit cone shaped.

This is my inspiration, but the measurements is off, if you compares the inch and cm measurements – they don’t add up. So rather use the picture for guidance and do your own pattern based on your measurements 

I’ve started with measuring my husbands head since it is he who will wear it   and I decided to make the gore a bit wider then what the picture on the inspiration-side suggest, and I also will make the gusset on the bias so it will stretch (making it possible to have a snug fit but not riskt it to be to small or press on the skull).
Note that my husband holds the measuringtape a bit to high.
Take a couple of measurements around the head and settle for the larger one.

* * * * * * * * * * * * * * * * * * * * * * *

Det här kommer bli en kort tutorial. Jag kommer inte visa så mycket av själva sömnaden denna gång, men du kan hitta teknikerna jag använt i tidigare sew-alongs.
Du känner redan till vilka stygn du ska använda när du syr (om du har missat det så leta på min sew-along för kjorteln och posten som heter ”dags att sy” ) så vi kör på direkt 

Denna gång kommer jag göra en väldigt enkel huvudbonad. Det är i princip en upp och nervänd konformad påse.

Det här är min inspiration för detta. Men måtten är inte att lita på. Om du jämför inch med cm så stämmer dom inte. Så använd snarare bilden för inspiration och guide till hur ditt mönster bör se ut i slutänden och använd mått som passar för ditt huvud. 

Jag började med att mäta min makes huvud eftersom det är han som ska använda denna   och jag bestämde mig för att göra kilen bredare än vad det ser ut att vara på bilden på inspirationssidan och den är också klippt på skrå för att bli lite stretchig.  (vilket gör det möjligt att ha en snäv passform men utan att klämma eller riskera att bli för liten.)
Notera att min make håller måttbandet lite högt också. Ta gärna flera mått och välj det som blev störst.


Since it says on the linked page that the crown (or rather ”the bottom of the bag” as I think of it) is made of two pieces, I did sew 2 pieces of fabric together before I made the circular shape. But you can use a single piece if you wish.
If you are good at math you can calculate the measurements of the bottom piece and the smallest with of the bands so they fit when you are going to sew everything together.
But you can also take the band and measure the narrowest part against something circular (a bowl perhaps) and then trace the shape of the bowl that fits the best. Dont forget to add seam allowance 

Then I sew the top and bottom bands together, and then sewing down the seam allowances so I have a nice size piece of fabric.
Don´t forget to press the seams as it makes it easier to sew down the seamallowances as well as making it flatter and nicer to watch.

Fold the big piece of fabric that you just made and sew the sides together so you get a kind of tunnel. Press and sew down the seam allowance here as well.

* * * * * * * * * * * * * * * * * * * * * * *

Eftersom det står på den länkade sidan att toppen / ”the crown” (eller snarare ”botten på påsen” som jag ser det) är gjord av två delar så sydde jag ihop 2 bitar tyg innan jag klippte ut cirkelformen. Men vill du hellre ha en hel bit så funkar det lika bra.
Om du är bra på matte så kan du helt enkelt räkna ut vilken diameter på cirkeln (botten) du behöver. Eller så kan du göra som mig och mäta med den smalaste delen på bandet för att hitta rätt omkrets på en skål eller liknande och sen rita av skålen. Glöm inte att lägga till sömsmån bara 

Sen sydde jag ihop dom två banden och sydde ner sömsmånerna så jag har en platt stor bit av tyg att jobba med.
Glöm inte att pressa sömmarna eftersom det gör det lättare när du fäller sömsmånerna och det blir dessutom mycket plattare och snyggare resultat.

Vik ihop den stora tygbiten som du just tillverkat och sy ihop sidorna så du får en sorts tunnel. Pressa och sy ner sömsmånerna här också.


When you have sewn it together and sewn down the seam allowance, then it is time to fit the bottom (crown) on it.
I start by measuring out 4 points on both the bottom and the narrow end of the tunnel.
On the bottom-piece you can fold it 2 times in half and put a pin or a chalkline in each fold (just the outer edge) so you end up with it marked out in quarters.
Then you do the same with the end of the tunnel.
Now you have 4 evenly marked out places to pin the bottom to the end of the tunnel. Check the fit. You should have a little bulk, but not so much that it will form folds.
You can tack it in place now and really test the fit.
When you are satisfied that it will work, just sew it in place and sew down the seam allowanse as always 

* * * * * * * * * * * * * * * * * * * * * * *

När du har sytt ihop det och sytt ner sömsmånen så är det dags att sätta på botten (eller locket, hur du vill se det).
Jag börjar med att dela in både botten och den smala delen av tunneln i 4 delar.
På bottendelen så viker jag helt enkelt den på mitten och sen mitten igen och sätter en nål eller ett kritstreck i varje veck så den blir indelad i 4 kvartar.
Sen gör jag likadant med änden på tunneln.
Nu har du 4 lika stora delar mellan markeringarna. Nåla ihop markering mot markering. Kolla av passformen. Det ska vara lite extra tyg mellan nålarna, men väldigt lite, det ska inte bildas veck när du syr ihop.
För att verkligen kolla passformen så kan du tråckla fast delen.
När du är nöjd med passformen så syr du fast den och fäller sömmarna som vanligt 


Now it is time for the gusset.
I chose to make the slit for the gusset about 13-14 cm from the side seam.
Then I pressed the edges of the slit so I can sew in the gusset from the outside as shown in the sew along for the kirtle.
To make sure that the cap will fit I just pinned the gusset in place and then my husband could try it on for size.

* * * * * * * * * * * * * * * * * * * * * * *

Nu är det dags för kilen.
Jag valde att göra slitsen för kilen ungefär 13-14 cm från sidosömmen.
Sen pressade jag kanterna på slitsen så jag kan sy kilen från rätsidan på det sätt jag visar i min sew-along för kjorteln.
För att vara säker på att mössan kommer att passa så nålade jag fast kilen och sen fick maken testa storleken.


Sew the gusset in place and sew down the seam allowance, then hem the cap and you are finished.

* * * * * * * * * * * * * * * * * * * * * * *


Sy fast kilen, fäll sömmarna på den och fålla mössan så är du klar sen.

Finishing touches / Avslutande detaljer

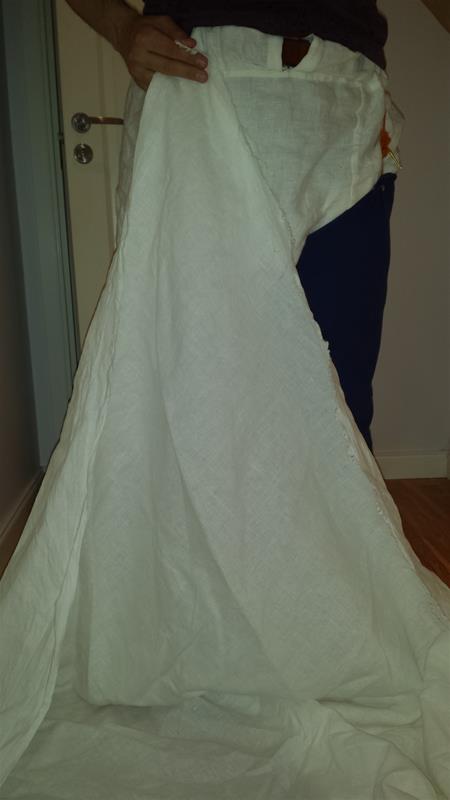
Today I were at a sew-date at another medievalist and finished the last hose.
I’ve gotten a cry for help a couple of days ago, so I ’m sewing a complete outfit for a friend now and this blogpost has been kept on ice for a while because of that.

* * * * * * * * * * * * * * * * * * * * * *

I dag var jag på en sydejt hos en annan medeltidare och sydde klart sista hosan.
Eftersom jag fick ett rop på hjälp för ett par dagar sedan och nu håller på att sy en komplett outfit till en vän så har den här bloggposten fått ligga på is ett tag.
* * * * * * * * * * * * * * * * * * * * * *
* * * * * * * * * * * * * * * * * * * * * *

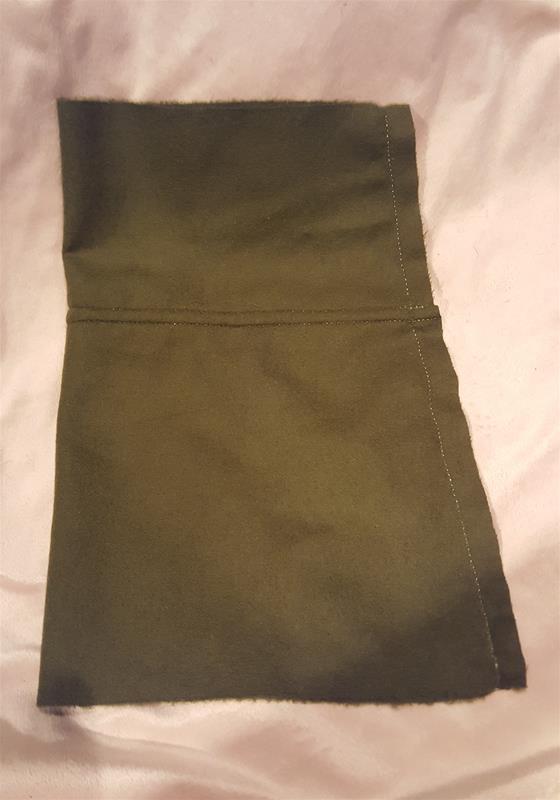
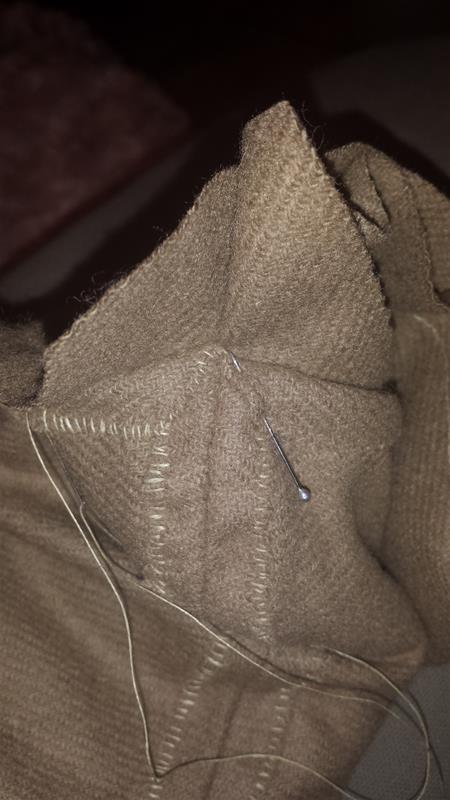
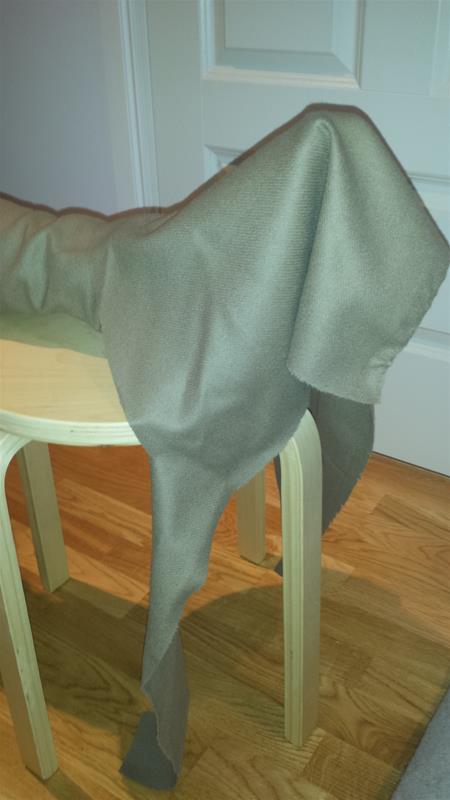
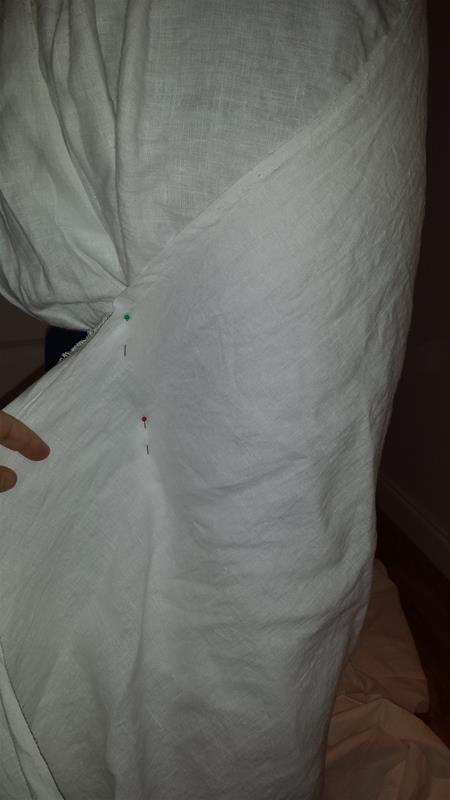
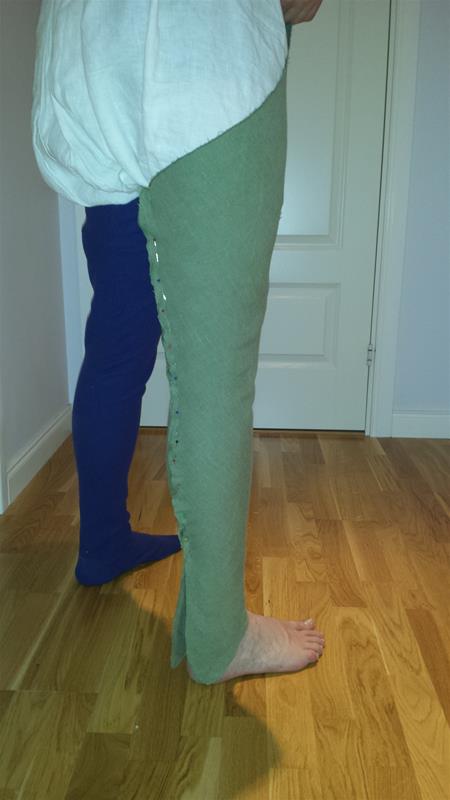
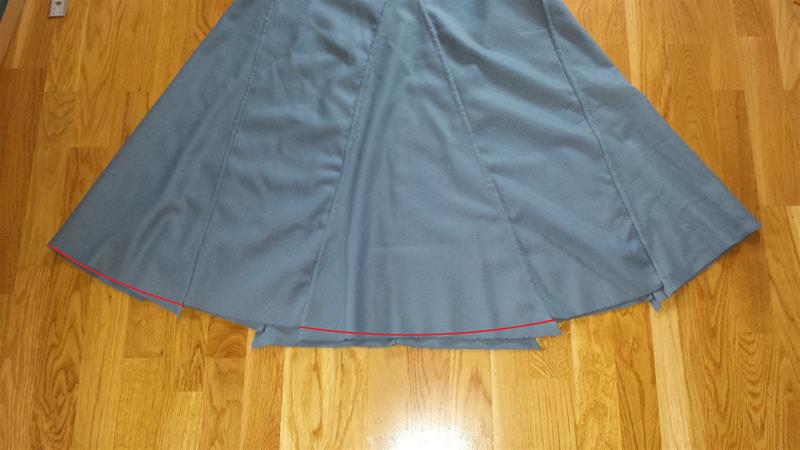
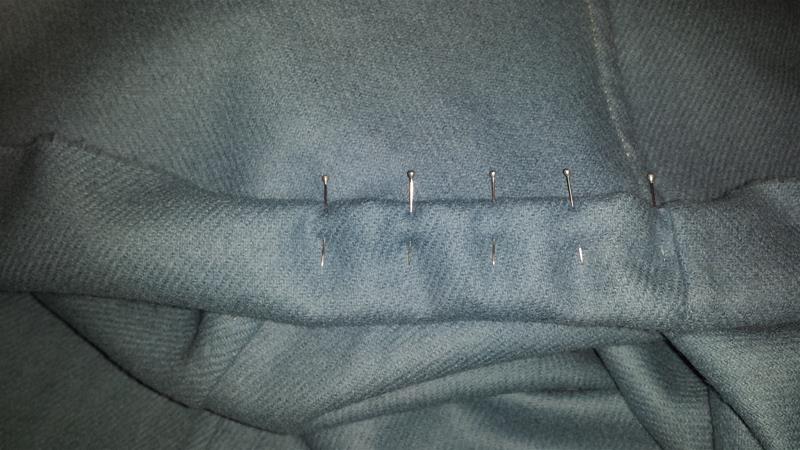
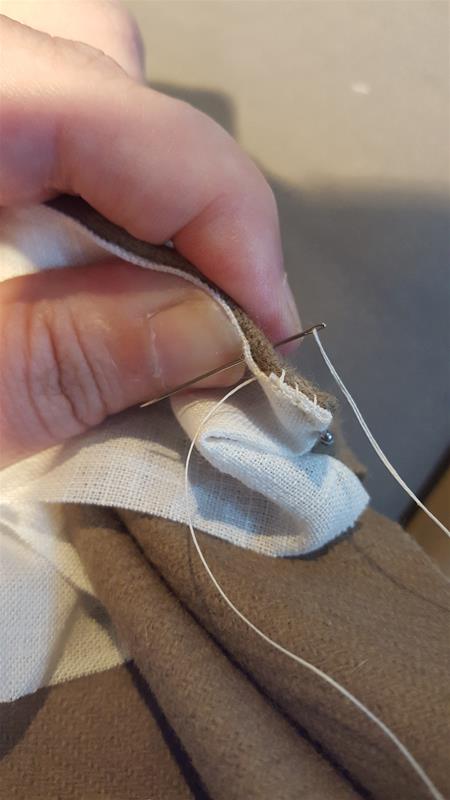
I decided to line the hose with a strip of linnen fabric, just to make them a bit sturdier as the last ones I made stretched out a bit and is now a bit loose around the thigh.
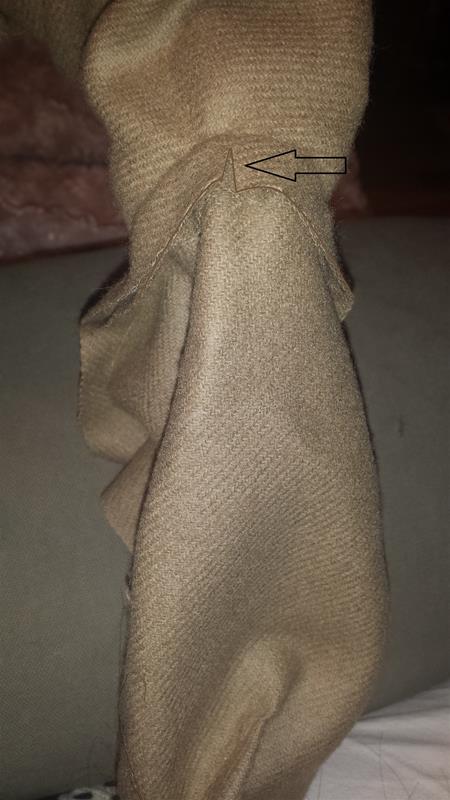
And since I wanted to strengthen the hose at the front tip, i decided to make the linnen strips overlap there.
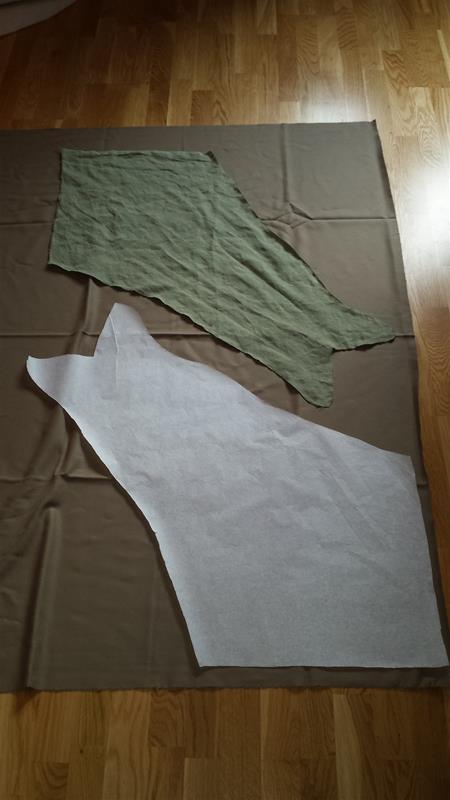
You can either use one long strip or two shorter and join them in the back of the hose (in line with the back seam). I used to shorter strips.

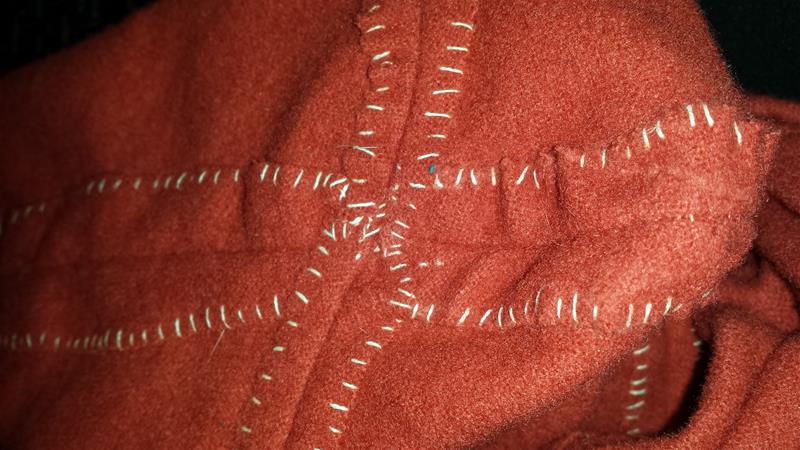
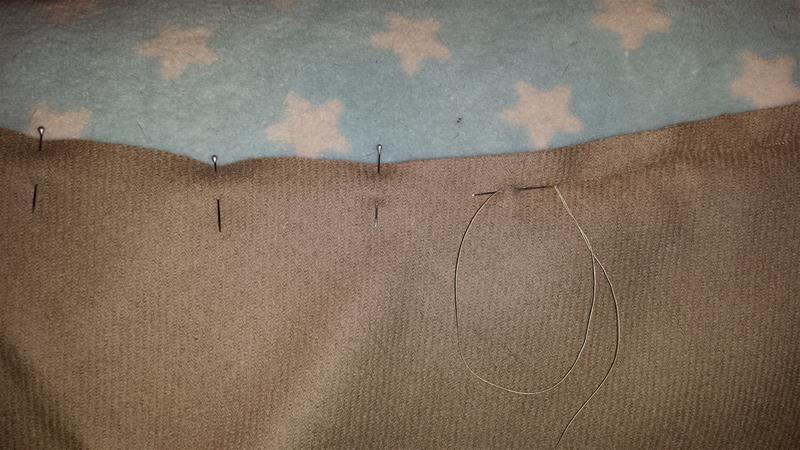
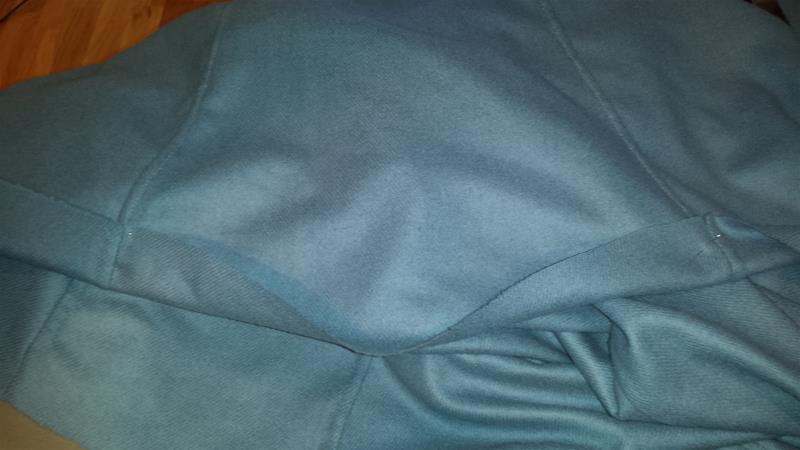
So first, start by cutting or tearing the strips in the with and length you want. Then fold the seam allowance in and make it flat by running your nails along the fold.
Press down the edge of the wollen hose so it will be easier to sew them together.
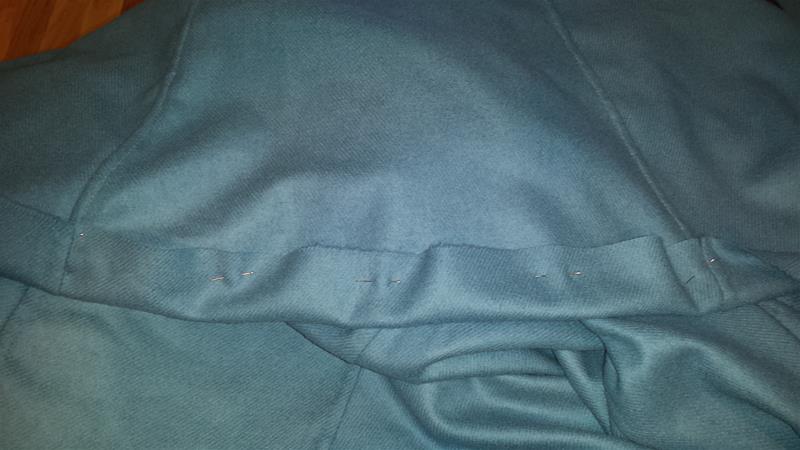
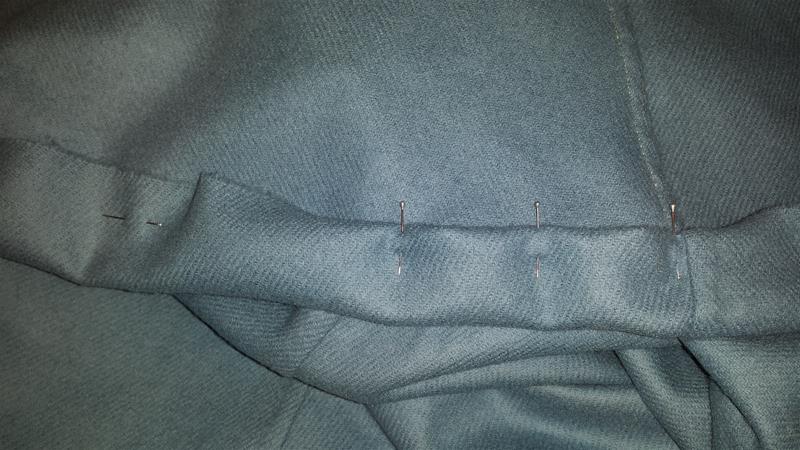
Then start to pin it in place if you feel that you need to do that, and just sew it in place with a seam of your choice. I used an overcasting seam.

* * * * * * * * * * * * * * * * * * * * * *


Jag bestämde mig för att stärka upp hosorna med en remsa av linnetyg denna gången för att göra dom lite stadigare. Dom förra jag gjorde sträcktes ut lite runt låren och är nu lite lösa där.
Och eftersom jag också ville stärka upp runt den främre spetsen så valde jag att lägga remsorna omlott där.
Du kan göra en lång remsa som går hela vägen runt eller två kortare och skarva mitt bak.
Jag använde två kortare.

Så, börja med att klippa eller riva linneremsorna till den bredd och längd du önskar. Sen viker du in sömsmånen och drar med nageln över den vikta kanten tills du har plattat till det.
Pressa ner kanten / fållen på yllehosan så blir det lättare att sy ihop delarna.
Sen nålar du fast remsan om du känner att du behöver det, och sy ihop dom med valfri söm. Jag har valt en överkastande söm här.


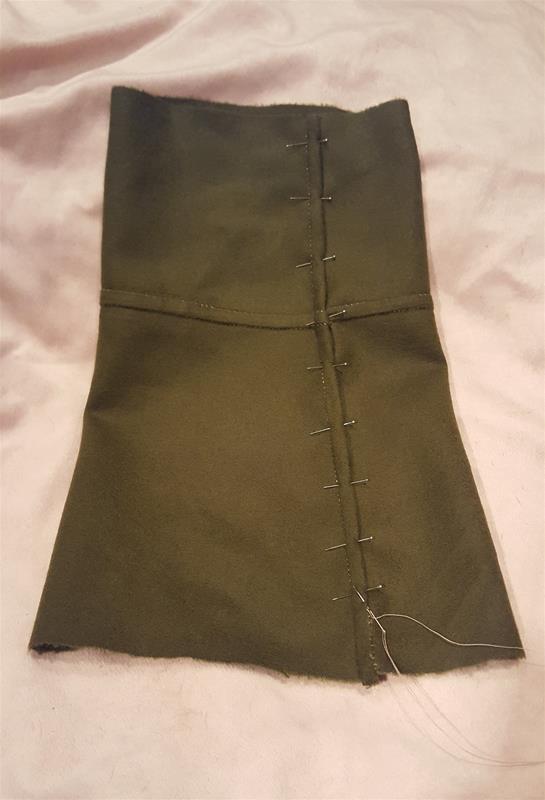
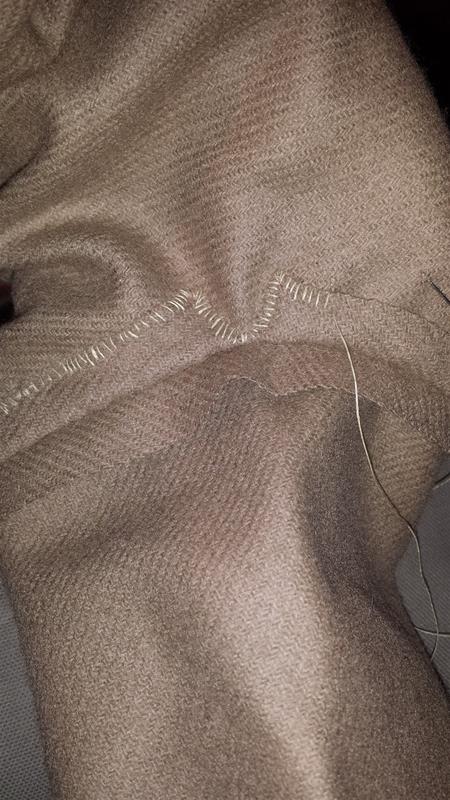
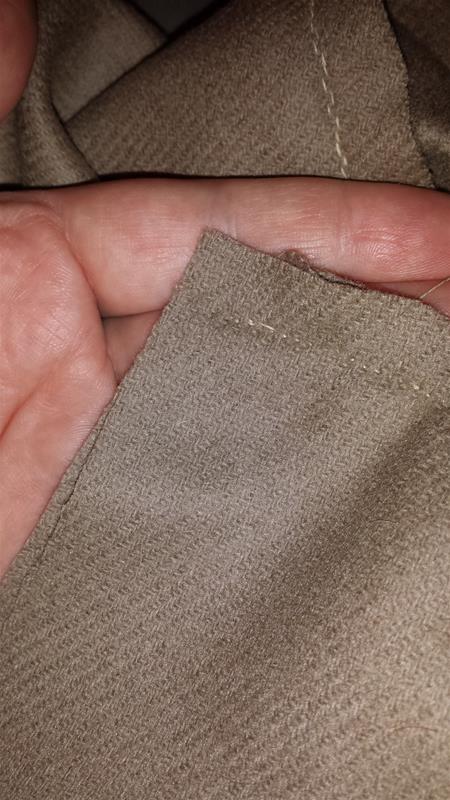
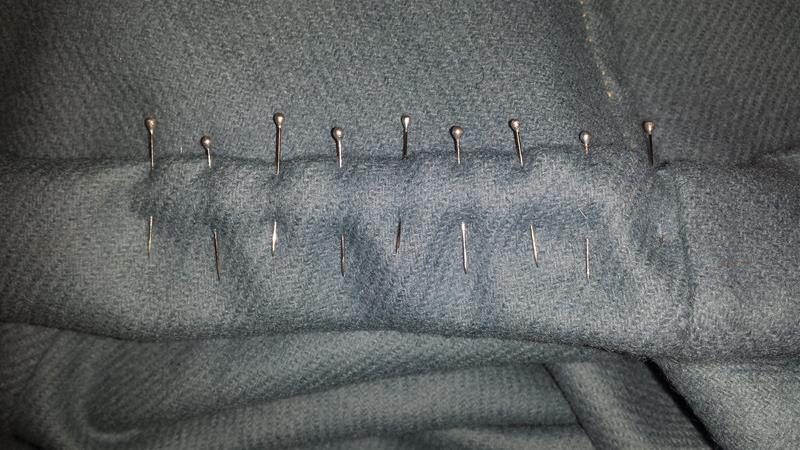
When you sewn all around the edge of the hose, you can do the same with the inner edge of the linnen strip.

* * * * * * * * * * * * * * * * * * * * * *

När du har sytt hela vägen runt ytterkanten så gör du samma sak på andra sidan av linneremsan.


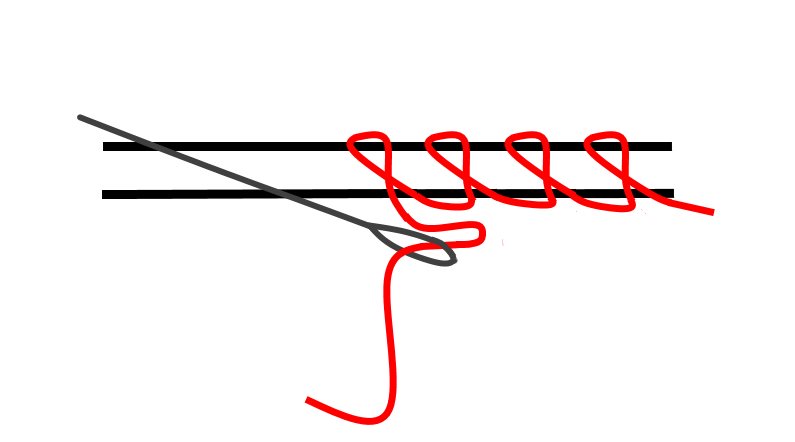
This stitch have I used several times before, so you should know it by now 

* * * * * * * * * * * * * * * * * * * * * *

Det här stygnet har jag använt flera gånger tidigare, så du borde känna igen det nu 

* * * * * * * * * * * * * * * * * * * * * *

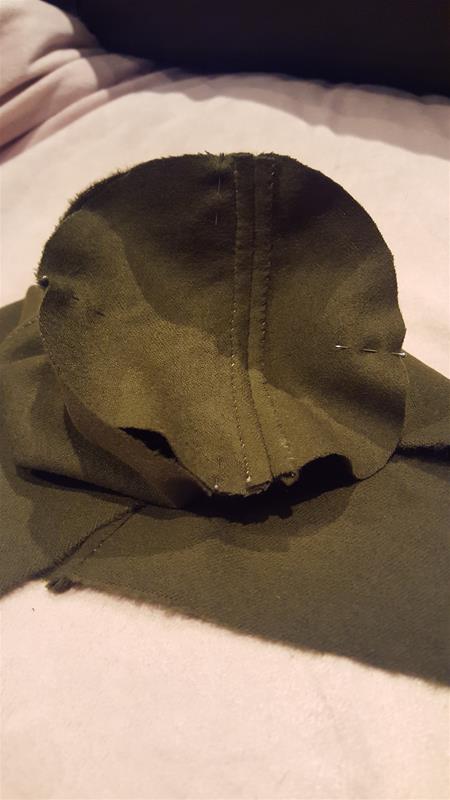
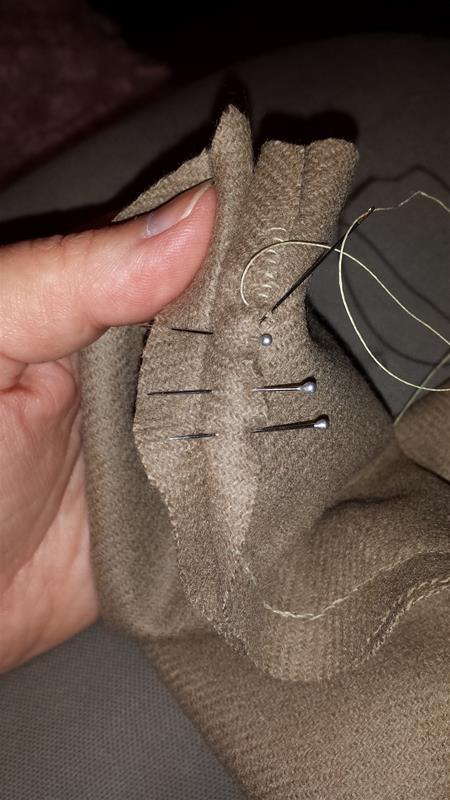
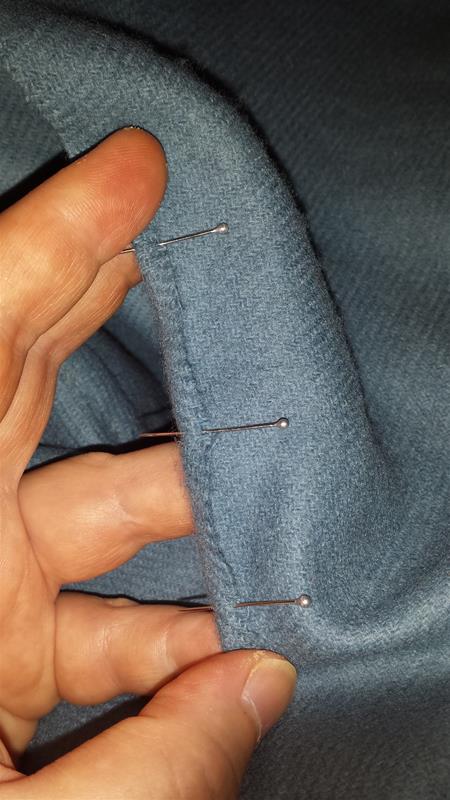
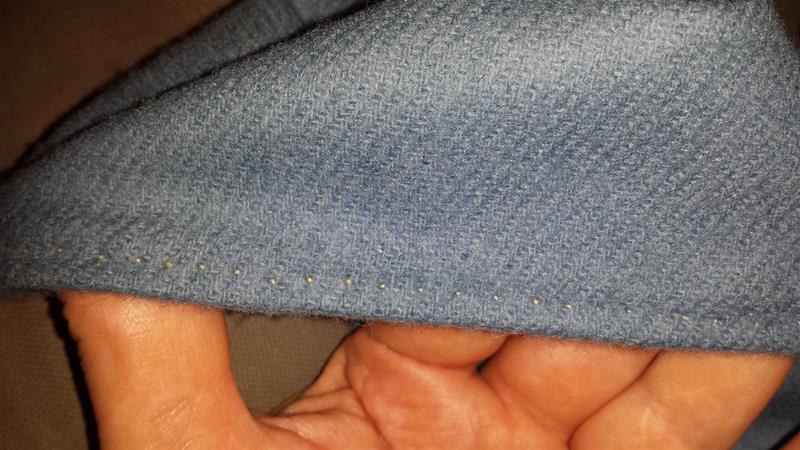
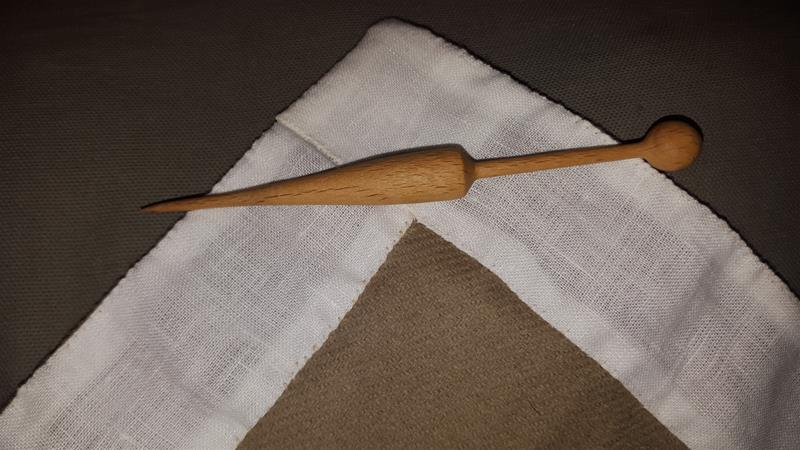
When you have sewn the linnen strip in place, you now have to make two lacing holes to be able to tie the hose to your linnen braies.
I use one of these, i don’t know the word for it in English, but if you don’t have one or cant find one, you can use an knitting needle or anything else with this shape.
Because if you pry apart the threads in the fabric to do the lacing holes, it will be a lot stronger than if you cut a hole.

* * * * * * * * * * * * * * * * * * * * * *

När du har sytt fast linneremsan så är det dags att göra två snörhål i varje hosa så att du kan knyta fast dom i brokorna.
Jag använder en sån här (en pryl) men man kan även använda en strumpsticka eller något annat med liknande form. Anledningen är för att om du bänder isär trådarna i tyget så får du ett mycket starkare snörhål än om du klipper upp ett hål.


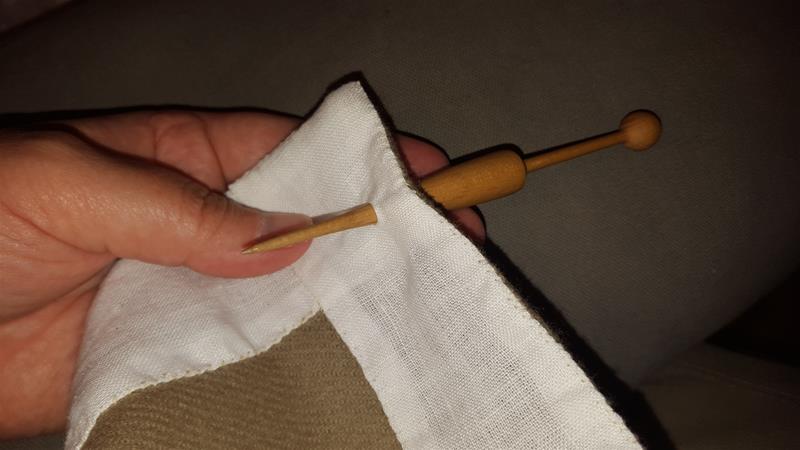
Prey the threads apart until you have a big enough hole, you will have to repeat this a couple of times while sewing the lacing hole as it will shrink otherwise.

* * * * * * * * * * * * * * * * * * * * * *

Bänd isär trådarna tills du har ett tillräckligt stort hål, detta kommer du behöva upprepa några gånger medan du syr också eftersom det annars kommer att krympa ihop igen.


Use buttonhole stitches to sew around the hole.
There is quite a lot of tutorials on buttonhole stitches. You can explain these in several ways, and I will explain my way here. But if you don’t understand my way, try some one elses 
The important thing is to get kind of a knot on the thread that will end up at the edge of the hole. This will make it more durable.

* * * * * * * * * * * * * * * * * * * * * *

Använd knapphålsstygn för att sy runt hålet.
Det finns en hel del tutorials på knapphålsstygn. Man kan förklara dom på flera olika sätt, och jag kommer försöka förklara på mitt sätt här. Men om du inte förstår mitt sätt, så prova någon annans 
Det viktigaste är att få en sorts knut på tråden i kanten av hålet. Det gör sömmen mer motståndskraftig mot slitage.

* * * * * * * * * * * * * * * * * * * * * *

* * * * * * * * * * * * * * * * * * * * * *

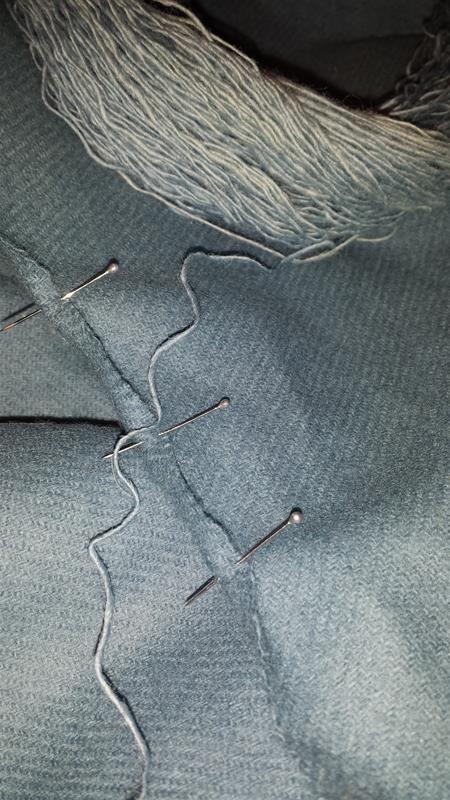
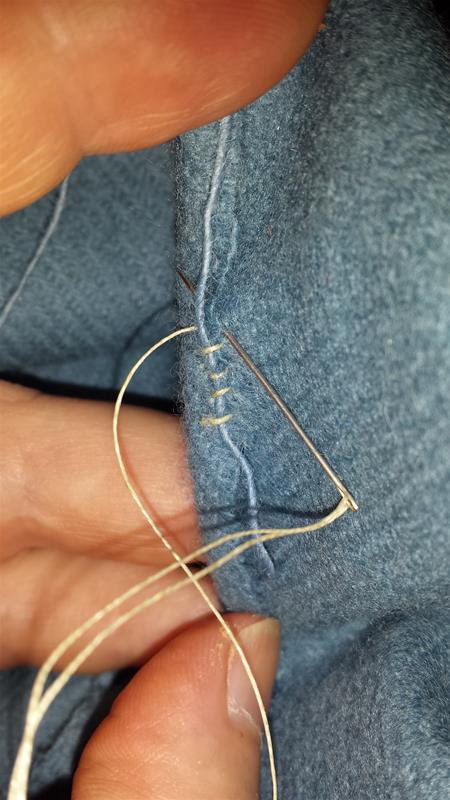
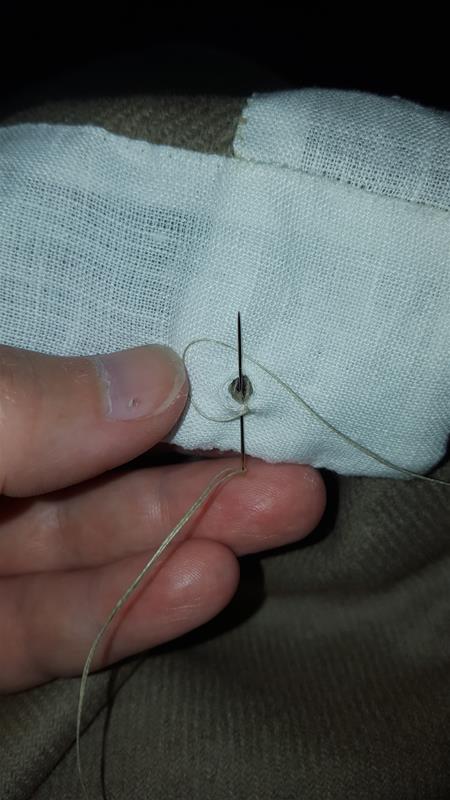
I sew my button holes and lacing holes from the backside. They usually gets prettier that way.
So put the needle trough the fabric, then up in the hole at the left of where the thread last came trough the fabric (the left of the last stitch).
Then put the thread in front of the needle in a loop that then goes on the back of the needle.

* * * * * * * * * * * * * * * * * * * * * *

Jag syr mina knapphål och snörhål från baksidan, dom brukar bli finare på så sätt.
Så nålen ska gå genom tyget och sen upp genom hålet. Du syr åt vänster så att du alltså tar nästa stygn till vänster om senaste stygnet.
Sen låter du tråden gå framför nålen och i en båge runt och bakom nålen.


When you pull the needle trough, you should get a loop that looks like this.

* * * * * * * * * * * * * * * * * * * * * *

När du drar igenom nålen nu så bör du få en ögla som ser ut såhär.

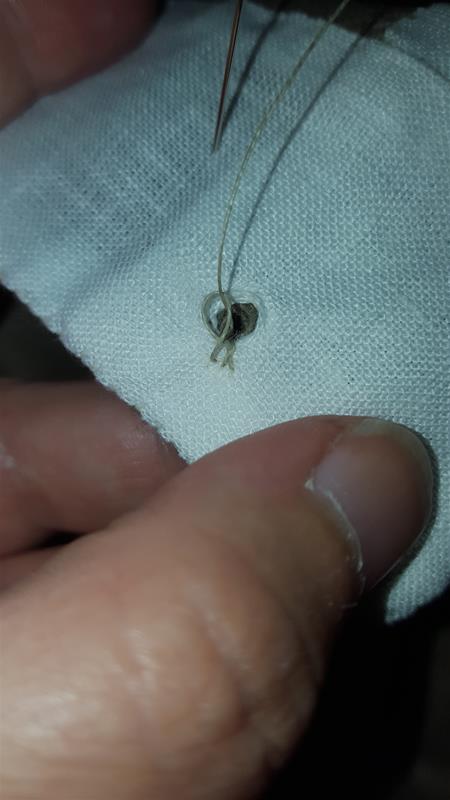
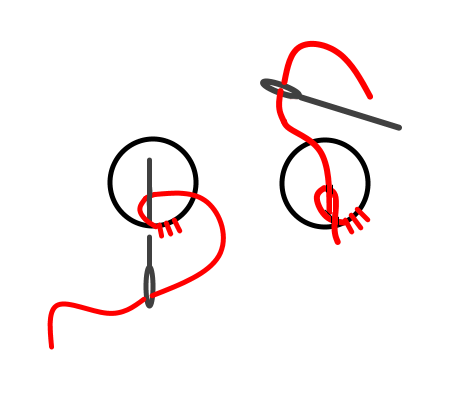
See how it twists around the thread?
That will make a knot. Try to place the knot on the inner edge of the hole.
Don’t forget to use your tool to keep the size of the hole.

* * * * * * * * * * * * * * * * * * * * * *


Ser du hur den vrider sig runt tråden?
Det kommer bilda en knut. Försök placera knuten på innerkanten av hålet.
Glöm inte att använda prylen för att se till att du håller storleken på hålet.

* * * * * * * * * * * * * * * * * * * * * *

* * * * * * * * * * * * * * * * * * * * * *


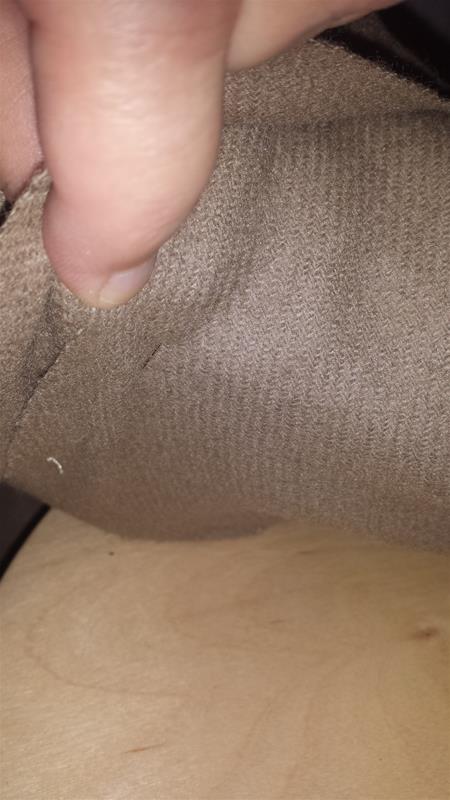
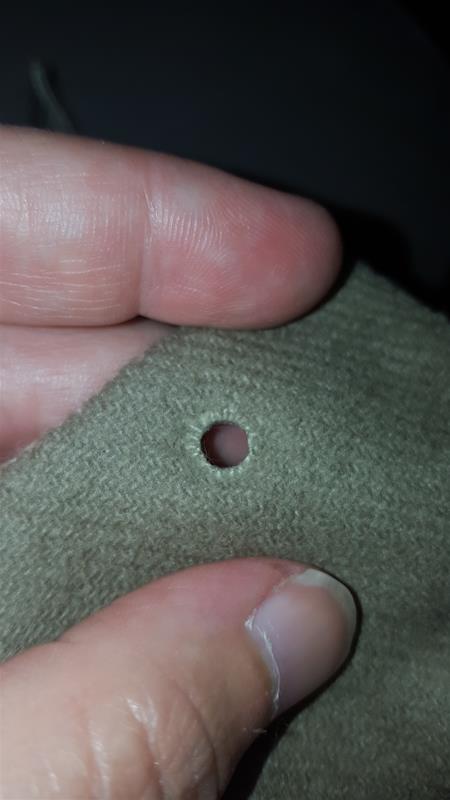
This is how a finished hole should look like from the inside and outside.

* * * * * * * * * * * * * * * * * * * * * *

Så här ska ett färdigt hål se ut från både fram och baksida.


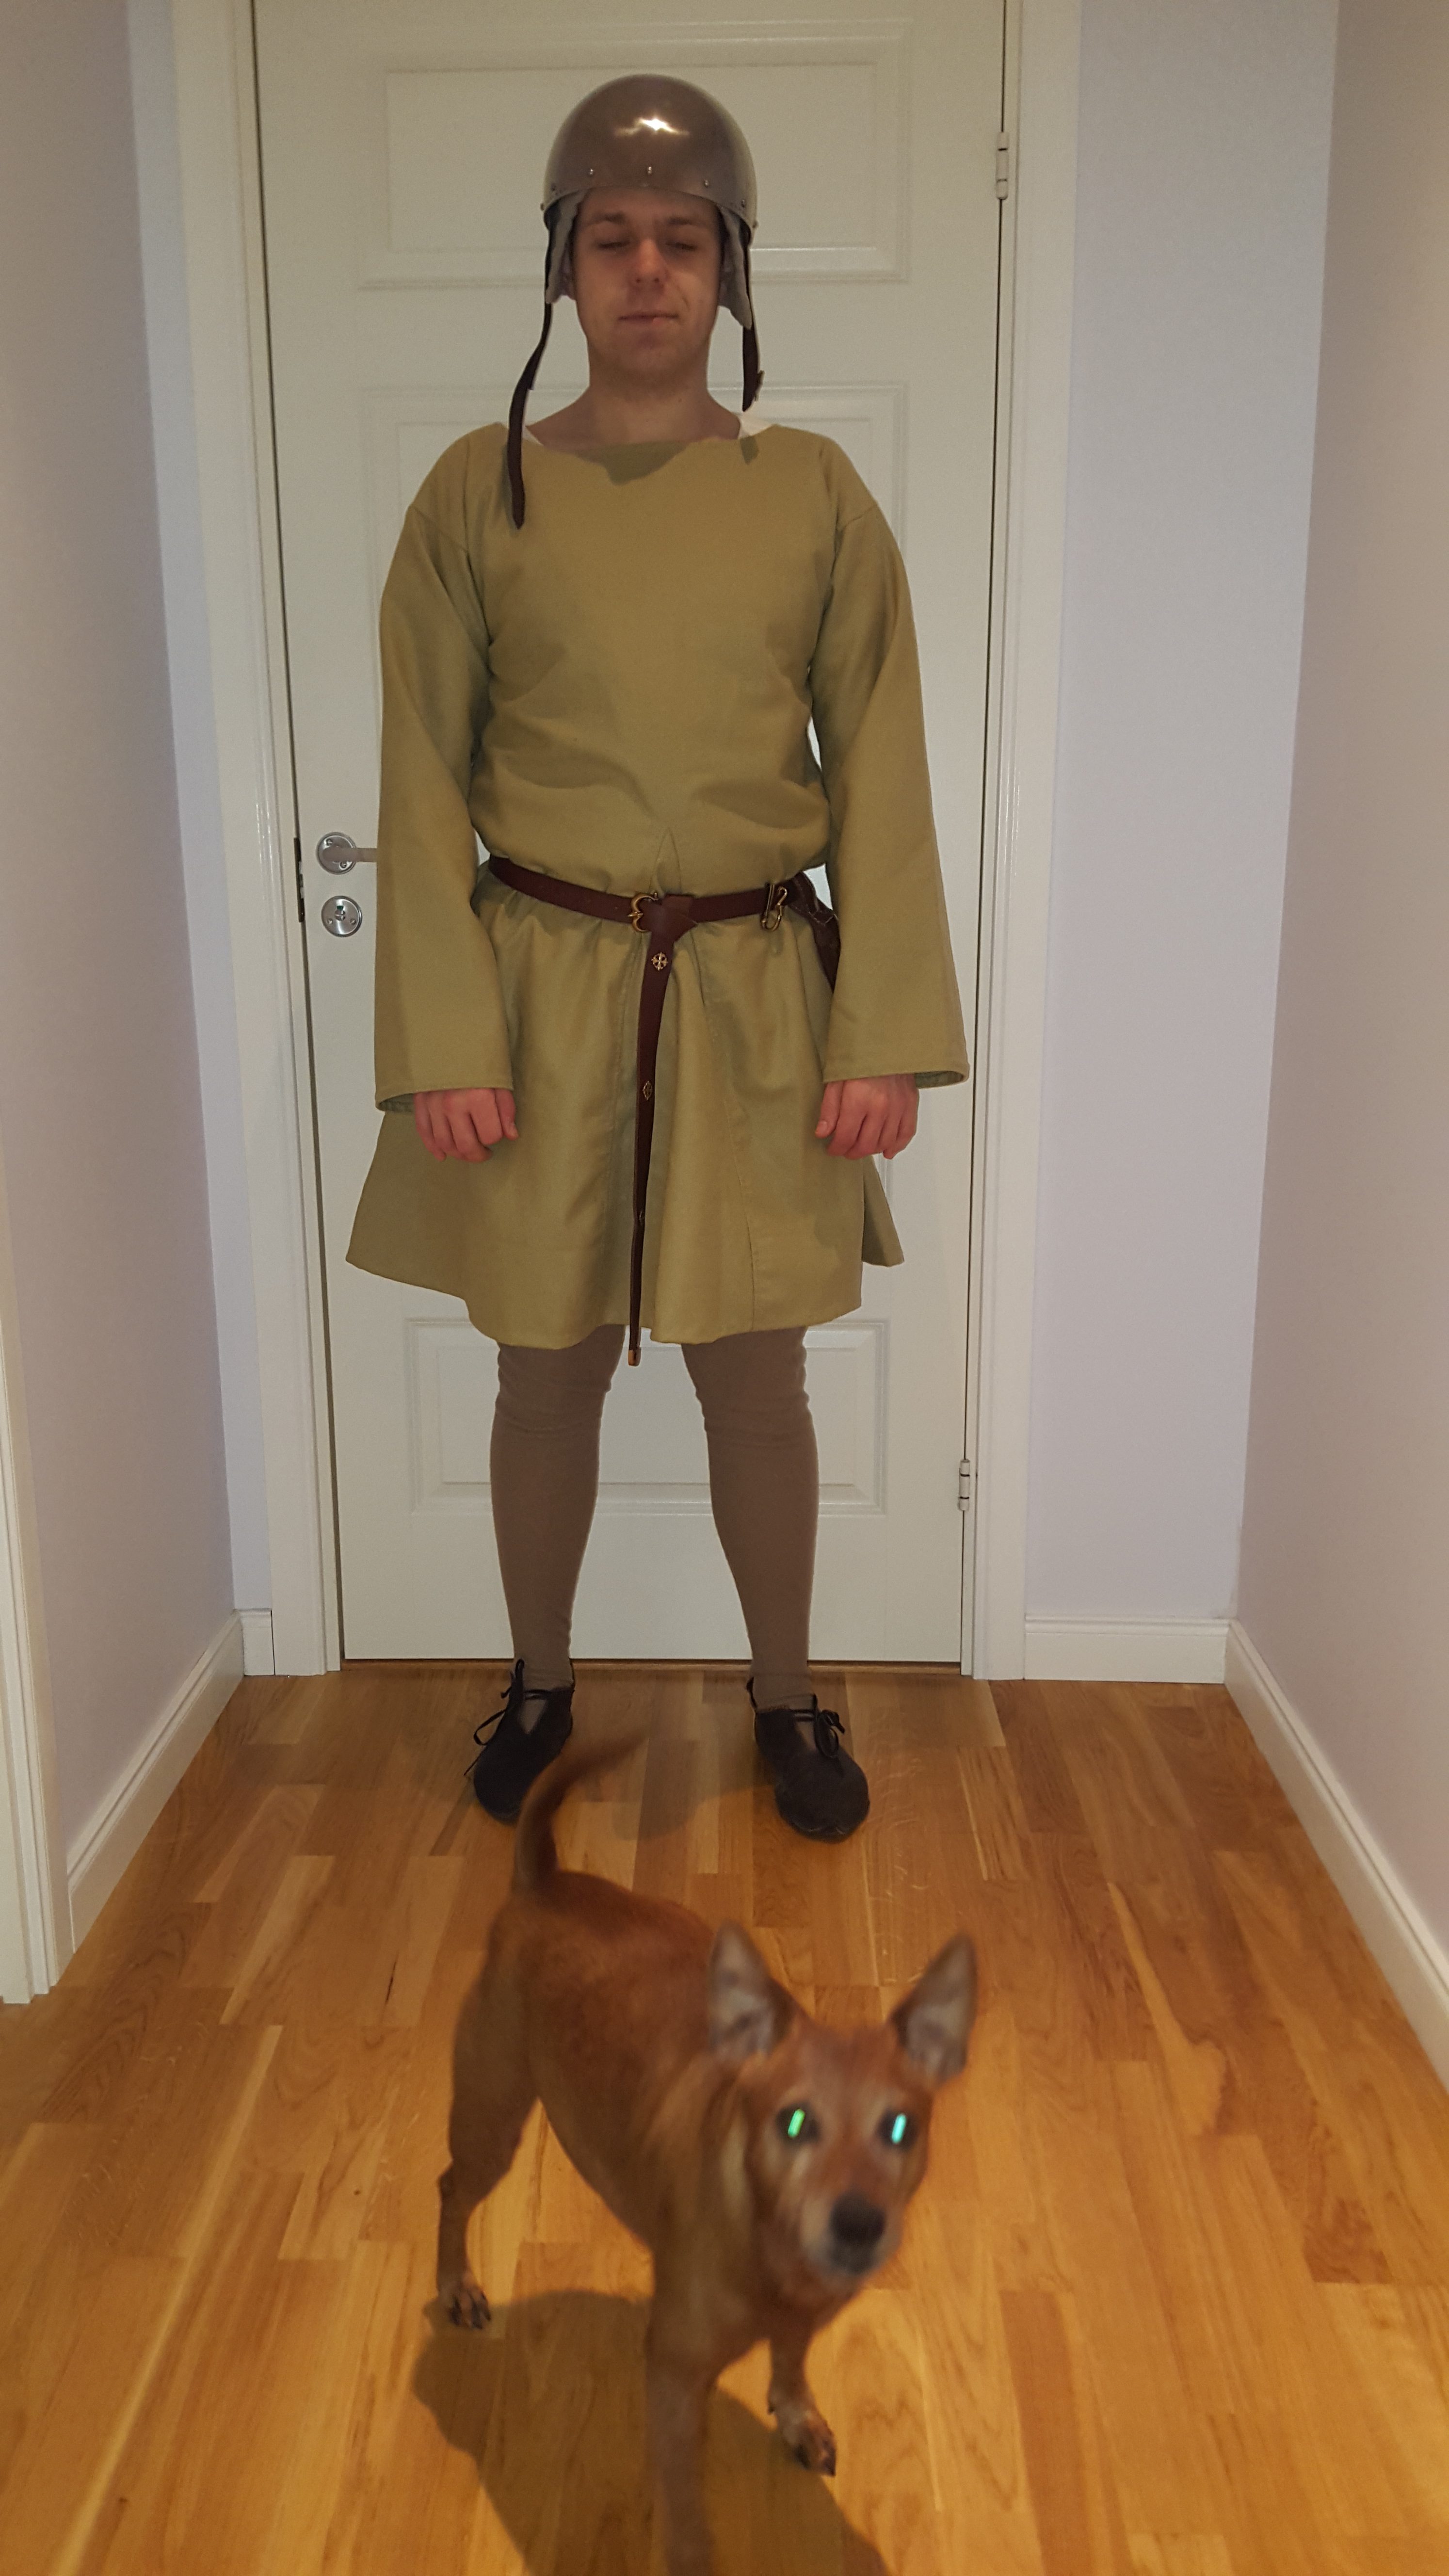
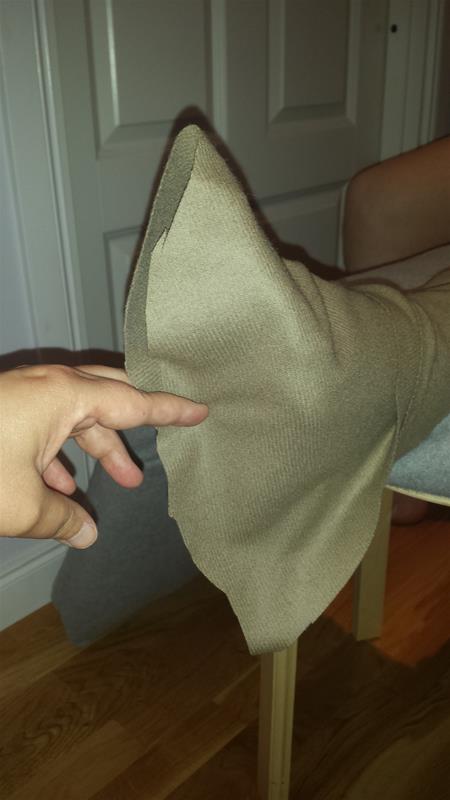
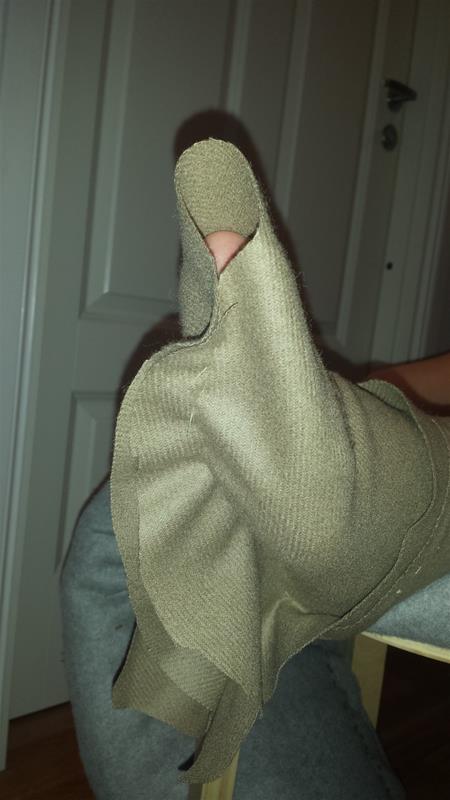
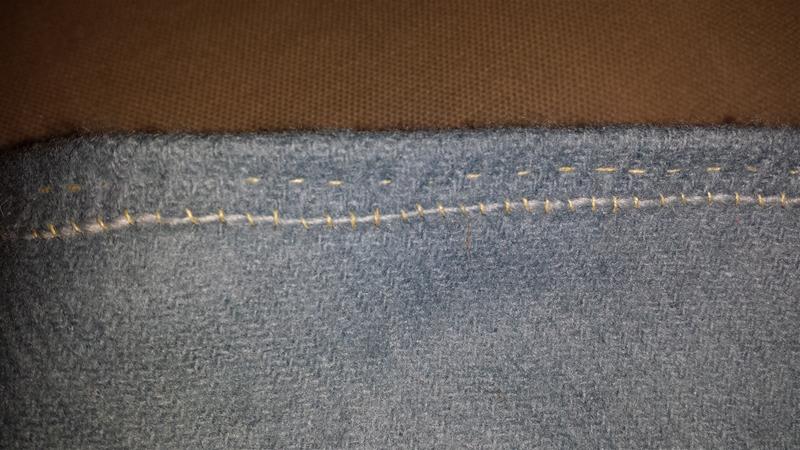
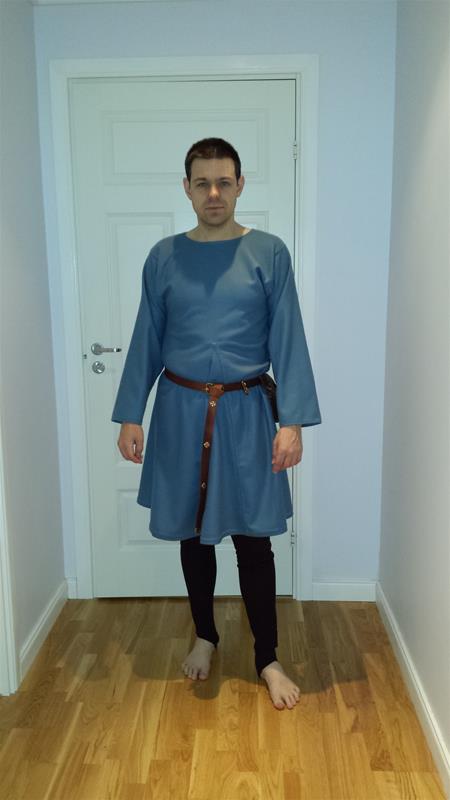
And here is the finished result 
* * * * * * * * * * * * * * * * * * * * * *

Och så här blev resultatet 

Making it nice and flat / Att få det platt och fint

A seam under the foot? That sounds quite inconvenient – right?

Well, it can be. And it can be quite nice.
I found that a wider seam allowance makes it nicer, since you almost get the feeling of having a nice felted sole under the foot.

So how do you make it flat? You are going to have a ”crossing” under the foot were the seams meet.

* * * * * * * * * * * * * * * * * * * * * *

En söm under foten? Det låter rätt obkevämt – eller hur?

Tja, det kan det vara. Och det kan vara rätt trevligt också.
Jag har märkt att om jag använder en bredare sömsmån så blir det skönare eftersom du nästan får känslan av att ha en filtad sula under foten.

Så hur får du det platt? Du kommer ju att ha en ”korsning” under foten där sömmarna möts.


* * * * * * * * * * * * * * * * * * * * * *
* * * * * * * * * * * * * * * * * * * * * *

I basically just trim off access fabric, leaving as little as the fabric can handle.
If the fabric freys – I leave more…
So, cut of the corners where the seams meet, fold them in and sew them down with narrow stitching.

* * * * * * * * * * * * * * * * * * * * * *

Praktiskt taget så trimmar jag bara bort överflödigt tyg och lämnar så lite det bara går för tygets räkning.
Om tyget fransar sig – så lämnar jag mer…
Så, klipp bort hörnen där sömmarna möts, vik in dom och sy ner dom med täta stygn.


This is an old picture of my first hose – not so nice stitching 
But you can see the finished crossing better here.

* * * * * * * * * * * * * * * * * * * * * *

Det här är en gammal bild på min första hosa – så inte så snygga stygn 
Men du kan se det slutgiltiga resultatet bättre här.


So, that is under the foot. How about on the top?
Just cut straight to the seam on the foot-part, but not all the way in, leave a couple mm.

* * * * * * * * * * * * * * * * * * * * * *

Så, det är under foten. Hur gör man ovanpå då?
Klipp rakt mot sömmen på fot-delen, men inte hela vägen in, lämna några mm.

Then just spread the edges apart when you sew the seam allowance down.

* * * * * * * * * * * * * * * * * * * * * *

Sen delar du bara på snittet när du syr ner sömsmånen.

A foot that fits / En passande fot

Now we have come to the part where you need to make the foot-piece.
This can be done in a couple of ways. For those who doesnt want a seam under the foot, you can drape a piece of fabric on the foot and stitch it onto the leg-piece. And then make a sole for the hose and stitch together.

But I don´t mind a seam under the sole of the fot, for me it would rather be quite agonising to have a seam on the outside of my foot, since one of my feet has been sliced open on the side three times due to surgery.
When I sew down the seam allowance on the hose, I do it as smooth as I can, and I also make a wider seam allowance under the foot than usual. I think that it makes it almost unnoticeable.
You can make the seam allowance as wide as the foot if you want. In that case you practically got an extra sole. 

* * * * * * * * * * * * * * * * * * * * * *

Nu har vi kommit till den del då foten ska täckas.
Det här kan man göra på flera olika sätt. För er som inte vill ha en söm under foten så kan ni drapera ett tygstycke över foten och sy fast mot bendelen. Sen gör ni en sula och syr ihop alltihop.

Jag tycker inte att sömmen under foten stör något dock. För mig skulle det snarare bli rätt plågsamt att ha en söm på sidan av foten eftersom min ena fot har blivit uppskuren där tre gånger pga operationer.
När jag syr ner sömsmånen på hosor så försöker jag alltid göra det så plant som möjligt och under foten försöker jag dessutom göra sömsmånen bredare och då tycker jag att den knappt känns.
Sömsmånen kan du göra så bred du vill, den kan täcka hela vidden av foten. På så sätt får du praktiskt taget en exta sula.

* * * * * * * * * * * * * * * * * * * * * *
* * * * * * * * * * * * * * * * * * * * * *

When you put your pattern on the fabric you probably noticed that you got two big cornerpieces left over.
Now you are going to use one (or two, depending on how big the pieces are and how big the feet are).

* * * * * * * * * * * * * * * * * * * * * *

När du la på mönsterdelarna på tyget så märkte du antagligen att du fick två stora hörnbitar över.
Nu ska du använda en av dom (eller båda, beroende på hur stora bitarna är och hur stor foten är).

Start by putting the leg of the hose on and make sure it has the seam were it is supposed to be (center back of the leg and down around the heel.
Then drape the triangle piece around the foot with the straight corner pointing away from you (or the one wearing the hose) . Make sure that you have enough fabric under the toes that you can cover it from the sides.


* * * * * * * * * * * * * * * * * * * * * *


Börja med att ta på hosbenet och kontrollera att sömmen är centrerad bak och ner runt hälen.
Drapera sedan triangeln över foten med 90-graders-hörnet pekandes bort från dig (eller från den som har hosan på sig). Kontrollera att det finns tyg så det räcker till att täcka under tårna när du viker in tyget från sidorna


Start tacking the cornerpiece of the fabric on to the leg-piece. Usually you have to do this two times since it is hard to get the fabric smooth over the foot at once.

* * * * * * * * * * * * * * * * * * * * * *

Börja med att tråckla fast hörndelen av tyget mot ben-delen. Vanligtvis får man göra det här två gånger eftersom det är svårt att få tyget slätt över foten på en gång.

I am starting under the foot and working my way around.

* * * * * * * * * * * * * * * * * * * * * *


Jag börjar under foten och arbetar mig runt.


When I have tacked the cornerpiece on to the leg-piece you can (if you want) trim the fabric down a bit.
Don´t take to much.
Check if you need to make corrections to the seam you just made right now (if it is wery croocked or anything else that is obviously ”off”).
Then you can start tack it under the foot. Either from the heal to the toes or the other way. Line it up with the seam that you have under the heel. Make sure that the fabric lays smooth around the foot.

* * * * * * * * * * * * * * * * * * * * * *

När du har tråcklat fast hörndelen mot bendelen så kan du (om du vill) trimma ner tyget lite.
Men ta inte för mycket.
Kolla om du redan nu måste göra ändringar till tråckelsömmen (om det är väldigt snett eller annat som är uppenbart ”fel”).
Sen kan du börja tråckla under foten. Spelar ingen roll om du går från häl till tå eller tvärt om bara du får sömmarna att mötas bak vid hälen. Var noga med att tyget ligger slätt runt foten.

Check the fit again between the fot and the leg-part. Adjust if you need to.
Then sew around the toes, quite close but with wiggleroom.

* * * * * * * * * * * * * * * * * * * * * *

Kolla passformen mellan fot och bendel igen och anpassa om det behövs.
Sen tråckla runt tårna. Rätt tight men med rörelsemån.

* * * * * * * * * * * * * * * * * * * * * *

* * * * * * * * * * * * * * * * * * * * * *

I just realised that I missed the picture of how i tacked in front of the toes. And I don’t have the picture left.
But just follow the curve of the toes, about 2 mm in front of them and it will be ok.

* * * * * * * * * * * * * * * * * * * * * *

Jag insåg precis att jag har missat bilden på hur jag tråcklade framför tårna. Och jag har inte bilden kvar.
Men följ kurvan som tårna bildar och tråckla ca 2 mm framför tårna så blir det bra.

Time to get started / Dags att börja

It is time to start to sew the leg-part of the hose, so start by pinning the edges.
Then use backstitches to sew it together as they are a bit stretchy and you want as much stretch as you can get (you can read more about stitches in the post for the kirtle that is name Time to sew).

* * * * * * * * * * * * * * * * * * * * * *

Nu är det dags att sy ihop kanten på ben-delen. Så börja med att nåla.
Sen använder du efterstygn för att sy ihop det eftersom att dom stygnen är lite stretchiga och du vill ha så mycket stretch som du bara kan få. (du kan läsa mer om stygn i posten för kjorteln som heter Dags att sy)


When you get to the heel-part, don´t sew all the way to the edge, as it will be easier when you get a bit further. Stop about 1 cm from the edge.

* * * * * * * * * * * * * * * * * * * * * *

När du kommer till häl-delen så sy inte hela vägen fram till kanten. Det kommer underlätta för dig när du kommer lite längre i sömnaden. Stoppa ungefär 1 cm från kanten.


When you have gotten this far, you can either sew down the seam allowance right now, or wait until the foot-part is in place.
On this pair I’ve chosen to sew it down directly.
I want a flat surface, so even if it frays a bit, I won’t fold it in or put a filler thread there. I just sew tighter just under and around the heel-area where the most friction will occur.
I pin tightly, but I start with quite wide space and then put needles in between untill I am happy with how flat it is.
If I stretch it around a curved surface when I pin and sew, it will help. Here I use my finger to stretch the fabric into a smooth shape.

* * * * * * * * * * * * * * * * * * * * * *


När du har kommit så här långt så kan du antingen välja att fälla sömmarna direkt eller att vänta tills fotdelen är klar.
På det här paret valde jag att fälla direkt.
Jag vill ha en så plan yta som möjligt så även om tyget fransar sig lite så kommer jag inte vika in sömsmånen eller lägga i fyllnadstråd, utan jag syr bara tätare, speciellt runt hälområdet där det blir mest friktion.
Jag nålar tätt, men  jag börjar med rätt brett mellan nålarna och fyller i emellan tills jag är nöjd med hur plant det är.
Om jag sträcker tyget över något rundat när jag nålar och syr så kommer det att hjälpa. Här har jag använt mitt finger för att sträcka tyget till en slät form.

(and pin a bit tighter)

* * * * * * * * * * * * * * * * * * * * * *

(och så nålar vi lite tätare)

Patternmaking for hose / mönsterskapande för hosor

Finally…
I´ve been stuck with a couple of other items I needed to sew, but now I’m on the right track again 

If you like to have the well fitted hose you can see in the manuscripts, then you need to make a toile.
Take an old sheet or other wowen fabric.
For my husbands hose I used a fullsize old sheet and started by letting him hold the corner of the sheet in the hight he wanted to have his hose.

* * * * * * * * * * * * * * * * * * * * * *

Äntligen…
Jag har fastnat med lite annan sömnad men nu är jag på rätt spår igen 

Om du vill ha dom välsittande hosor som du kan se på manuskriptbilderna så måste du göra en toile.
Ta ett gammalt lakan eller något annat vävt tyg.
För makens hosor använde jag ett fullstort gammalt lakan och började genom att låta honom hålla hörnet av lakanet i den höjd han ville att hosorna skulle vara.


Then I pull the fabric to the back of the leg, while he is still holding on to the corner of the sheet, and start pinning it as smooth and tight as I can get it.
I found it easier to make a good toile if you have the right kind of underweare so therefore he has the braies on.

* * * * * * * * * * * * * * * * * * * * * *
Jag drar tyget mot baksidan av benet medan han fortfarande håller i hörnet på lakanet och börjar nåla det så slätt och tight som jag kan få det.
Jag har märkt att det är lättare att få en bra toile om man har rätt underkläder så därför har han sina brokor på sig.


About here… I remembered that I already had a toile, so i switched to that one (no need to cut up any more fabric then you need to   )

When you have pinned all way down you can either say that you are happy with it, mark out where the pins are on both sides (both front and back of the pins. Where you are going to sew later on) and trim off the excess fabric. Or you can take a needle and thread and tack it togeather so that the one in the toile can test it out without being pricked by the pins, can he sit, walk and so on?
I recommend the latter.
My pattern goes all the way down under the heel so it is much simpler to tack it together with needle and thread around the heel.

* * * * * * * * * * * * * * * * * * * * * *

Ungefär här… kom jag på att jag redan hade en toile, så jag bytte till den (onödigt att klippa upp mer tyg än man måste  )

När du har nålat hela vägen ner så kan du antingen säga att du är nöjd med det, märka ut vart nålarna är på båda sidor (alltså båda sidorna där du ser nålar och där du senare kommer sy) och klippa bort överflödigt tyg. Eller så kan du ta nål och tråd och tråckla ihop det så att den som är i toilen kan testa att sätta sig, gå osv utan att sticka sig på nålarna, kan han röra sig i den?
Jag rekommenderar att man tråcklar om man inte är helt säker på att det här kommer funka.
Mitt mönster går hela vägen ner under hälen och det är så mycket lättare att tråckla den biten än att nåla.


Since this is the old pattern for the blue hose on the other leg, I know that it fits, so I didn’t pin it around the heel, but I tried to show how it will curv around it.

When you are happy with the fit and how you can move in it, it is time to cut out the fabric.
For my husband I only do one toile for one leg and use for both. But for my knee high hose I need to make a toile for each leg since my legs aren’t the same shape. So if you have one knee that is thicker or one calf or… Well do a toile for each one. It doesn’t take that long to do, but it will look much nicer.

As I don’t have two patterns here, I made a copy in a cheap paper for patternmaking. That helps in positioning the legs on the fabric.

You want to go across the grain of the fabric with the front center of the hose. This will make the fabric a bit stretchy.
Notice that I haven’t made any toile for the foot, and I won’t do it later. I’ll show you how I do it and then you can decide if you want to do a mockup or do it on the fly as I do 

* * * * * * * * * * * * * * * * * * * * * *

Eftersom det här är det gamla mönstret för den blåa hosan på andra benet så vet jag ju att det passar så jag nålade inte fast den runt hälen, men jag försökte visa hur tyget kommer böja sig runt.

När du är nöjd med passformen och hur det går att röra sig i det så är det dags att klippa ut tyget.
Till maken gör jag bara en toile för ena benet och använder det som mall för båda. Men för mina knähöga hosor behöver jag göra två toiler, en för varje ben eftersom mina ben inte har samma form. Så om du har ett knä som är tjockare än det andra eller om du har en tjockare vad så gör två toiler, det tar inte så mycket längre tid att göra men det kommer se mycket bättre ut när det är klart.

Eftersom jag inte hade två tolier här att lägga på tyget så gjorde jag en kopia i billigt mönsterpapper. Det hjälper när man ska positionera mönstret på tyget.

Du ska lägga ut delarna på skrå (dvs diagonalt över trådriktningen) för att få ut så mycket stretch som möjligt.
Och som du nog har sett så har jag inte gjort en toile för fotdelen, vilket jag inte kommer göra heller.
Jag kommer visa hur jag gör längre fram, så kan du själv bestämma om du vill göra en testbit eller köra direkt som jag gör 


Remember…
Don’t forget the seam allowance when you cut it out.

* * * * * * * * * * * * * * * * * * * * * *

Glöm inte sömsmånen nu när du klipper ut delarna.

Step 6 – Hemming / Fållning

So, now you have sewn down all the seam allowances. It is time to hem the kirtle.
But first you have to make the lower hem even…

* * * * * * * * * * * * * * * * * * * * * *

Så, nu när du har fällt alla sömmar så är det dags att fålla kjorteln.
Men först måste du ju trimma fållen så den blir jämn 

When you start to fold in the lower edge of the kirtle, try to mach the seams to each other. That way you always know that it doesn’t start to twist away while hemming.

The part where there is gussets you will have excess fabric when you fold them up, so you will need to pin it good. I will show you how I mean.

* * * * * * * * * * * * * * * * * * * * * *

När du börjar vika in nedre kanten på kjorteln så är det bra om du försöker matcha ihop sömmarna. På så sätt vet du alltid att det inte kommer börja dra iväg och vrida sig när du fållar.

Kilen kommer ju vara bredare i nederkant än där du ska sy, så du kommer få överflödigt tyg när du viker in. Så nåla noga.
Jag kommer visa vad jag menar.

* * * * * * * * * * * * * * * * * * * * * *
* * * * * * * * * * * * * * * * * * * * * *

First – decide how much you should fold in/ how wide of a hem, and match up the seams

Först – bestäm hur mycket du ska vika upp/ hur bred fåll, och matcha ihop sömmarna


Then pin up the middle. And halfway between the middle and the seam.

* * * * * * * * * * * * * * * * * * * * * *

Sen nålar du upp mitten, och sen mittemellan mitten och sömmen


Do this all the way around. It can be good to try it on and se if the hem looks nice and even.
Then fold in the edge and start the real pinning.
Put the pins wide apart, always carefull to fold so straight as you can. And now I don’t mean to follow the grain were you cant (the gussets) but try to make sure that you have as even amount of fabric on both sides of the pin as you can manage.

* * * * * * * * * * * * * * * * * * * * * *

Gör det här hela vägen runt. Det kan vara bra att prova kjorteln nu och se om fållen ser jämn och fin ut.
Sen börjar du vika in kanten och nåla ”på riktigt”.
Sätt nålarna med rätt långt avstånd, var alltid noga med att försöka vika in så rakt du kan. Och nu menar jag inte att du ska följa trådriktningen där det inte går (i kilarna) utan försök helt enkelt att se till att ha lika mycket tyg på båda sidorna om nålen som du kan.


Put a new pin in the middle of the pins that you have put in.

* * * * * * * * * * * * * * * * * * * * * *

Sätt i en ny nål mellan dom nålar du har satt i.


And a pin between these pins…
Until you are happy with how it looks.

* * * * * * * * * * * * * * * * * * * * * *

Och en nål mellan dessa nålar…
Tills du är nöjd med hur det ser ut.


Now you can start to sew.
Use the same stitch as you did when you sewn down the seam allowance earlier.

* * * * * * * * * * * * * * * * * * * * * *

Nu kan du börja sy.
Använd samma stygn som du gjorde när du fällde sömmarna tidigare.

* * * * * * * * * * * * * * * * * * * * * *
* * * * * * * * * * * * * * * * * * * * * *

For the neckline and the end of the sleeves, i just fold the edge in a bit.
About 5 mm for the neckline and between 1 to 4 cm at the end of the sleeves (depending on what end result I want and how long the sleeve is).

* * * * * * * * * * * * * * * * * * * * * *

För halsringningen och änden av ärmarna så viker jag bara in tyget lite.
Ungefär 5mm för halsringningen och mellan 1 och 4 cm för ärmarna (beroende på vilket utseende jag vill ha på dom och hur lång ärmen är)


Then i select a filler thread that is as similar in colour as I can get it. If I cant find any in a good colour, then i don’t allways care about it, and just take a thread/yarn that is suitable for the fabric.

* * * * * * * * * * * * * * * * * * * * * *

Sen väljer jag ut en fyllnadstråd som är så nära i färg som jag kan komma. Men om jag inte kan finna en tråd i bra färg så brukar jag inte alltid bry mig så mycket i det, utan tar bara en som är lämplig för tyget.


Put the filler thread on top of the edge of the hem (where the fabric kan frey) and sew it in place. I use the same kind of stitch as when I am sewing down seam allowances (or hemming).

* * * * * * * * * * * * * * * * * * * * * *

Lägg fyllnadstråden ovanpå kanten av fållen (där tyget kan fransa sig) och sy fast. Jag använder samma stygn som när jag fäller sömmar eller fållar.


When i have finished the whole way around the neckline / sleeve. I do another stitch.
This is a kind of a backstitch, but after I’ve gone trough both layers of fabric in the back-stitch moment (when I have moved the needle behind the point where it appeared) I go back in between the layers and put the needle out without showing much more of the thread on the backside then on the front side (se the pictures below, first picture is frontside, the second picture is the backside/inside the third is an attempt of showing what I mean with a drawing).
This is both decorative and helps to keep the fabric from moving around and tug at the stitches where you have the filler thread.

* * * * * * * * * * * * * * * * * * * * * *

När jag har sytt hela vägen runt halsringningen / ärmen så gör jag ett till stygn.
Det här är en sorts efterstygn men efter att jag gått ner genom båda tyglagerna efter ”bakåt-momentet” (dvs när jag flyttar nålen till en position bakom där den kom upp tidigare) så går jag in mellan tyglagerna och för ut nålen utan att så mycket av tråden syns på baksidan än på framsidan (se bilderna nedan. Första visar rätsidan, andra avigsidan och den tredje är ett försök att visa vad jag menar med en teckning).
Det här är både dekorativt men hjälper också till att avlasta sömmen där fyllnadstråden ligger från dragningar.

And – this is the finished result. One picture without belt and one with.
Never mind the stockings… It is an old pair that no longer has any feet on (we kept them to use under another pair if it is cold outside)

* * * * * * * * * * * * * * * * * * * * * *

Så – slutresultatet. En bild med bälte och en utan.
Bry er inte om hosorna… Det är ett gammalt par som inte längre har fötter (vi har sparat dessa för att använda under ett annat par om det är kallt)


Now on to the next projet 🙂
I’ll show you soon…

* * * * * * * * * * * * * * * * * * * * * *

Så, nu är det dags att påbörja nästa projekt 🙂
Ni får snart se…

I like cookies. Have a few while you are browsing my page.